
Security Group In AWS
An AWS Security Group is a virtual firewall that controls inbound and outbound traffic for our EC2 instances. When we launch an EC2 instance, we associate one or more security groups with it. These security groups act at the instance level, not the subnet level, meaning they filter traffic for individual instances.
Think of it like this: if your EC2 instance is a house, the security group is the bouncer at the door, deciding who gets in and who gets out based on rules you define.
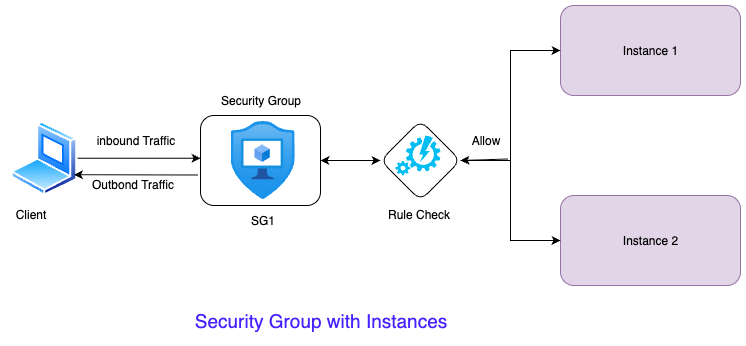
Key Points of Security Groups
- Instance-Level Firewall: Security groups operate at the instance level, not the subnet level. Each instance can have multiple security groups, and a security group can be associated with multiple instances.
- Stateful: Security groups are stateful. This means that if we allow inbound traffic on a specific port, the outbound return traffic for that connection is automatically allowed, even if there isn't an explicit outbound rule for it. For example, if we allow inbound SSH, the SSH response traffic going back to our client is automatically permitted.
- Allow Rules Only: Security groups only support "allow" rules. We cannot create "deny" rules. If traffic doesn't explicitly match an allow rule, it is implicitly denied.
- Default Deny: All inbound traffic is implicitly denied by default, and all outbound traffic is implicitly allowed by default. We must explicitly add rules to allow inbound traffic.
- Referencing Other Security Groups: We can reference other security groups in our rules. This is very useful for allowing traffic between instances that share a common function (e.g., allowing web servers to talk to database servers).
- Changes are Immediate: Any changes we make to a security group are applied immediately to all instances associated with that security group.
- Region Based: Security Group is Region based means based on region and avalability zone Security Group works.
Ways to Create a Security Group and Their Utility
We can create security groups using the AWS Management Console, AWS CLI, or AWS SDKs/CloudFormation.
Using the AWS Management Console (Web UI)
Steps:
- Navigate to EC2 Dashboard: Sign in to the AWS Management Console and go to the EC2 dashboard.
- Go to Security Groups: In the left navigation pane, under "Network & Security," click on Security Groups.
- Create Security Group: Click the Create security group button.
- Basic Details:
- Security group name: Give it a descriptive name (e.g.,
web-server-sg,ssh-access-sg). - Description: Provide a brief explanation of its purpose.
- VPC: Select the Virtual Private Cloud (VPC) where your instances will reside.
- Security group name: Give it a descriptive name (e.g.,
- Inbound Rules:
- Click Add rule.
- Type: Choose the type of traffic (e.g.,
SSH,HTTP,Custom TCP). - Port range: Specify the port (e.g.,
22for SSH,80for HTTP). - Source: Define where the traffic can come from:
My IP: Your current public IP address (good for SSH).Anywhere-IPv4:0.0.0.0/0(allows traffic from anywhere on the internet – use with caution for sensitive ports).Custom: Specify a CIDR block (e.g.,192.168.1.0/24) or another security group ID.
- Description (optional): Add a note for the rule.
- Outbound Rules:
- By default, all outbound traffic (
0.0.0.0/0) is allowed. - You can restrict this if needed (e.g., only allow outbound traffic to a specific database).
- By default, all outbound traffic (
- Create Security Group: Click the Create security group button.
Utility:
- Ease of Use: Ideal for beginners or when you need to quickly set up rules.
- Visual Management: Provides a clear overview of all rules.
- Interactive: Easy to add, modify, or remove rules on the fly.