OIDC Internal Working Flow
How OIDC works internally
How OIDC Works: Understanding the OpenID Connect Authentication Flow
If you have worked with modern applications, you have probably seen terms like OAuth 2.0, OpenID Connect (OIDC), Access Token, ID Token, Authorization Code, and PKCE.
At first, they can feel like pieces of a complicated puzzle.
But once you understand how these pieces work together, the OIDC flow becomes much easier to reason about.
In this article, we will walk through the complete OIDC Authorization Code flow, step by step, using a practical example.
What is OIDC?
OpenID Connect (OIDC) is an authentication protocol built on top of OAuth 2.0.
OAuth 2.0 primarily answers:
"What can this application access?"
OIDC adds the missing authentication layer:
"Who is the user?"
For example, imagine you are building an application called CS Techie Portal.
A user clicks:
Login with Google
Your application doesn't want to handle the user's Google password.
Instead, the application redirects the user to an Identity Provider (IdP) such as:
Google
Microsoft Entra ID
Okta
Keycloak
PingFederate
Auth0
The Identity Provider authenticates the user and tells your application who the user is.
That's where OIDC comes in.
OAuth 2.0 vs OIDC
Before looking at the flow, let's make one distinction very clear.
OAuth 2.0
OAuth 2.0 is primarily about authorization.
For example:
"Allow this application to access my Google Calendar."
The application receives an Access Token that represents permission to access a resource.
OpenID Connect
OIDC adds authentication on top of OAuth 2.0.
It answers:
"Who just logged in?"
The key addition is the ID Token.
So a simple way to remember it is:
OAuth 2.0 → AuthorizationOIDC → Authentication + Authorization
The Main Components
Let's first identify the actors involved.
For our example, we have four main components:
+------------------+| User |+--------+---------+ | v+------------------+| Browser / || Frontend App |+--------+---------+ | | v+------------------+| Identity Provider|| (IdP) |+--------+---------+ | | v+------------------+| Backend / || Resource Server |+------------------+
For example:
User → Deepak
Client Application → CS Techie Portal
Identity Provider → Keycloak
Resource Server → CS Techie API
The OIDC Authorization Code Flow
The most commonly used OIDC flow for web applications is the:
Authorization Code Flow below:
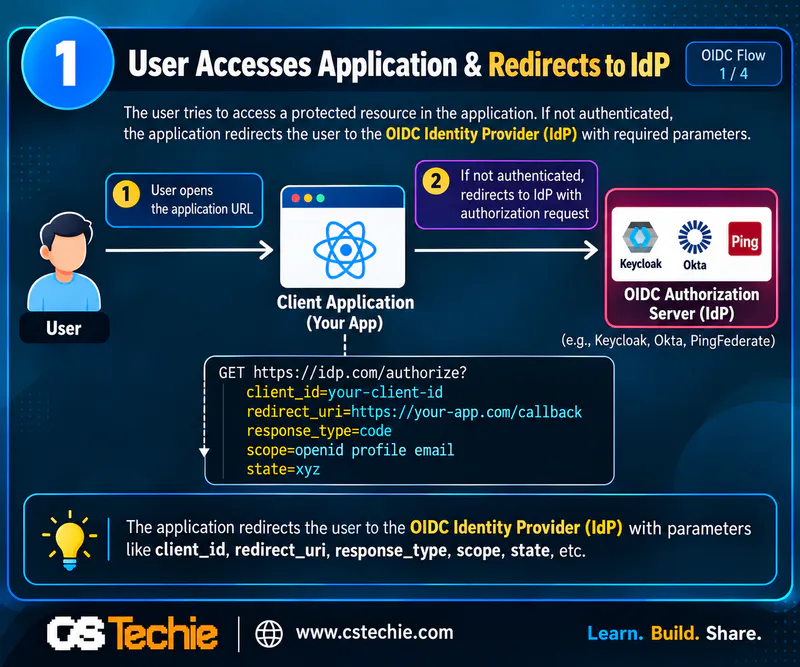
Step 1: User Clicks Login
The user opens:
https://cstechie.com
and clicks:
Login
The application doesn't ask the user for their password.
Instead, it starts the OIDC authentication process.
The application generates an authorization request.
A simplified request looks like this:
GET /authorize?client_id=cstechie-client&response_type=code &scope=openid profile email&redirect_uri=https://cstechie.com/callback &state=xyz123&nonce=abc456
Let's understand the important parameters.
client_id
Identifies your application to the Identity Provider.
client_id=cstechie-client
response_type
For Authorization Code Flow:
response_type=code
This tells the IdP:
"Give me an authorization code."
scope
OIDC requires the openid scope.
For example:
scope=openid profile email
openid tells the authorization server that this is an OIDC request.
profile can request profile information.
email can request email information.
redirect_uri
This is where the IdP sends the browser after authentication.
redirect_uri=https://cstechie.com/callback
The redirect URI must normally be registered with the Identity Provider.
state
The state parameter helps protect against CSRF attacks.
The application generates a random value and associates it with the authentication request.
Later, when the callback arrives, the application verifies that the returned state matches.
nonce
The nonce helps protect the OIDC authentication response against replay attacks and allows the client to associate the ID Token with the original authentication request.
Step 2: Browser Redirects to the Identity Provider
The browser is redirected to the Identity Provider.
For example:
https://auth.cstechie.com/realms/cstechie/protocol/openid-connect/auth
The important point here is:
The application never sees the user's password.
The user enters their credentials directly into the Identity Provider.
This is one of the major benefits of centralized authentication.
Step 3: Identity Provider Authenticates the User
The Identity Provider now authenticates the user.
Depending on the IdP configuration, this could involve:
Username and password
MFA
Social login
Passkeys
SSO
Smart cards
Enterprise authentication
For example:
User | | Username + Password vIdentity Provider | | Authentication successful vAuthenticated User
The Identity Provider may also establish its own session.
This is important because the next time the user accesses another application using the same IdP, they may not need to enter their credentials again.
That's the foundation of Single Sign-On (SSO).
Step 4: Identity Provider Returns an Authorization Code
After successful authentication, the Identity Provider does not immediately send the tokens to the browser in the Authorization Code flow.
Instead, it redirects the browser back to the application with a short-lived authorization code.
For example:
https://cstechie.com/callback? code=SplxlOBeZQQYbYS6WxSbIA &state=xyz123
The browser carries the code back to the application.
The important thing is:
The authorization code is not the Access Token.
It is a temporary credential that can be exchanged for tokens.
Step 5: Application Validates the State
The application receives:
code=SplxlOBeZQQYbYS6WxSbIAstate=xyz123
Before continuing, it validates the state.
For example:
Generated State:xyz123Returned State:xyz123
If they match:
Authentication request is valid
If they don't:
Reject authentication
This protects the application against certain CSRF attacks.
Step 6: Application Exchanges the Authorization Code
Now comes an important part of the flow.
The backend sends the authorization code to the Identity Provider's token endpoint.
For example:
POST /tokenContent-Type: application/x-www-form-urlencoded
with parameters such as:
grant_type=authorization_codecode=SplxlOBeZQQYbYS6WxSbIAredirect_uri=https://cstechie.com/callbackclient_id=cstechie-clientclient_secret=********
For a confidential server-side client, the client authenticates itself as required by the authorization server.
For public clients such as SPAs, PKCE is normally used instead of relying on a client secret.
Step 7: Identity Provider Returns Tokens
If the authorization code is valid, the Identity Provider returns tokens.
A simplified response might look like:
{
 "access_token": "eyJhbGciOi...",
 "id_token": "eyJhbGciOi...",
 "token_type": "Bearer",
 "expires_in": 3600,
 "refresh_token": "..."
}
The three important tokens are:
Access Token
Used to access protected APIs.
Application → APIAuthorization: Bearer <access_token>
ID Token
Contains information about the authenticated user.
It is normally a JWT.
For example:
{
 "iss": "https://auth.cstechie.com",
 "sub": "123456789",
 "aud": "cstechie-client",
 "email": "user@example.com",
 "name": "Deepak",
 "iat": 1792320000,
 "exp": 1792323600
}
Refresh Token
A refresh token can be used to obtain new access tokens without requiring the user to authenticate again, subject to the authorization server's policies.
Step 8: Application Validates the ID Token
This is one of the most important steps in OIDC.
The application should not simply decode the ID Token and trust its contents.
It needs to validate the token.
Typical validation includes:
1. Signature
The JWT signature must be valid.
The application can obtain the Identity Provider's public signing keys through its published JWKS endpoint.
For example:
/.well-known/openid-configuration
The discovery document typically provides the JWKS endpoint.
2. Issuer
The iss claim must match the expected Identity Provider.
"iss": "https://auth.cstechie.com"
3. Audience
The aud claim must identify the intended client.
"aud": "cstechie-client"
4. Expiration
The token must not be expired.
"exp": 1792323600
5. Nonce
For flows where a nonce was used, the application validates that the ID Token contains the expected nonce.
Only after these validations succeed should the application trust the authentication result.
Step 9: Application Creates Its Own Session
After successful OIDC authentication, the application may create its own application session.
For example:
Browser | | Secure HttpOnly Cookie vCS Techie Backend | | User Session vAuthenticated User
A secure session cookie might have attributes such as:
HttpOnlySecureSameSite
The exact configuration depends on the application's architecture and deployment model.
This is often preferable to exposing long-lived credentials directly to browser JavaScript.
Step 10: User Is Logged In
At this point the user can access the application.
For example:
User | vCS Techie | +---- Dashboard | +---- Courses | +---- Profile | +---- Protected APIs
The authentication process is complete.
What Happens When the User Calls an API?
Suppose the application calls:
GET /api/courses
The API needs to determine whether the request is authorized.
A typical OAuth-protected API request looks like:
GET /api/coursesAuthorization: Bearer <access_token>
The Resource Server validates the access token according to the architecture and token type.
It may check:
Signature
Issuer
Audience
Expiration
Scopes
Roles
Permissions
For example:
Access Tokenscope:courses:readcourses:writeroles:USER
The API can then make an authorization decision.
ID Token vs Access Token
This is probably one of the most common OIDC misunderstandings.
They are not interchangeable.
| Token | Purpose |
|---|---|
| ID Token | Tells the client about the authenticated user |
| Access Token | Allows access to protected resources |
| Refresh Token | Helps obtain new access tokens |
Think about it this way:
ID Token ↓"Who is the user?"Access Token ↓"What can this client access?"Refresh Token ↓"Can I obtain another access token?"
A common mistake is sending an ID Token to an API as though it were an Access Token.
Don't do that.
Where Does PKCE Fit?
Modern applications, especially public clients, commonly use PKCE (Proof Key for Code Exchange) with Authorization Code Flow.
The client generates a random:
code_verifier
It derives:
code_challenge
and sends the challenge during the authorization request.
Later, when exchanging the authorization code, the client sends the original verifier.
Conceptually:
Client | | code_challenge vIdentity Provider | | authorization code vClient | | code_verifier + code vIdentity Provider | | tokens vClient
The IdP verifies that the verifier corresponds to the previously supplied challenge.
This helps protect the authorization code exchange, particularly for public clients where a client secret cannot safely be kept.
Complete OIDC Flow
Now let's put everything together.
┌─────────────────────┐ │ User │ └──────────┬──────────┘ │ │ 1. Login ▼ ┌─────────────────────┐ │ Client App │ │ CS Techie │ └──────────┬──────────┘ │ │ 2. Authorization Request │ client_id │ scope=openid │ state │ nonce ▼ ┌─────────────────────┐ │ Identity Provider │ │ Keycloak / Okta │ │ Entra / Google │ └──────────┬──────────┘ │ │ 3. Authenticate User │ │ 4. Authorization Code ▼ ┌─────────────────────┐ │ Client App │ └──────────┬──────────┘ │ │ 5. Code Exchange ▼ ┌─────────────────────┐ │ Token Endpoint │ └──────────┬──────────┘ │ │ 6. ID Token │ Access Token │ Refresh Token ▼ ┌─────────────────────┐ │ Client App │ └──────────┬──────────┘ │ │ 7. Validate ID Token │ Signature │ Issuer │ Audience │ Expiry │ Nonce ▼ ┌─────────────────────┐ │ Application Session│ └──────────┬──────────┘ │ │ 8. API Request ▼ ┌─────────────────────┐ │ Resource Server │ │ API │ └─────────────────────┘Why OIDC Is So Popular
OIDC solves an important problem for modern applications.
Instead of every application implementing its own authentication system, organizations can centralize identity management.
For example:
Identity Provider │ ┌─────────────┼─────────────┐ │ │ │ ▼ ▼ ▼ Web App Mobile App APIThe Identity Provider becomes the central authority for authentication.
This makes it easier to implement:
Single Sign-On
Multi-Factor Authentication
Centralized identity management
Federation
Enterprise login
Role and group management
Token-based API security
OIDC Discovery
One of the useful features of OIDC is Discovery.
Instead of manually configuring every endpoint, the client can retrieve the provider's metadata from:
/.well-known/openid-configuration
The discovery document can contain endpoints such as:
{      "issuer": "https://auth.example.com",
      "authorization_endpoint": ".../authorize",
      "token_endpoint": ".../token",
      "userinfo_endpoint": ".../userinfo",
      "jwks_uri": ".../certs"
}
This allows OIDC clients and libraries to dynamically discover the provider's endpoints and capabilities.
OIDC in a Real Enterprise Architecture
Consider a company with multiple applications:
┌─────────────────┐ │ Identity │ │ Provider │ └────────┬────────┘ │ ┌────────────────────┼────────────────────┐ │ │ │ ▼ ▼ ▼ Employee Portal Banking App Admin Portal │ │ │ └────────────────────┼────────────────────┘ │ ▼ Protected APIsThe organization can centralize authentication with an Identity Provider such as:
Microsoft Entra ID
Okta
PingFederate
Keycloak
Auth0
Applications don't need to implement username/password authentication independently.
Common OIDC Mistakes
1. Treating OIDC and OAuth as the same thing
OAuth is primarily authorization.
OIDC adds authentication.
2. Sending the ID Token to an API
The ID Token is intended for the client.
APIs should generally receive an appropriate Access Token.
3. Not validating the ID Token
Simply decoding a JWT is not validation.
The application must verify the relevant security properties such as:
SignatureIssuerAudienceExpirationNonce
4. Ignoring the state parameter
The state parameter is an important CSRF protection mechanism in authorization flows.
5. Skipping PKCE for public clients
For public clients, PKCE is an important protection for the authorization code flow.
6. Storing sensitive tokens carelessly
Token storage requires careful consideration.
Avoid exposing sensitive credentials unnecessarily to browser JavaScript, and use appropriate secure cookie and session patterns where applicable.
The Simplest Mental Model
If you remember only one thing from this article, remember this sequence:
User -> Application -> Identity Provider -> Authenticate User -> Authorization Code -> Token Exchange -> ID Token + Access Token -> Validate -> Application Session -> Access Protected APIs
And remember the roles of the tokens:
ID Token    -> Authentication"Who are you?"
Access Token -> Authorization"What are you allowed to access?"
Refresh Token -> Token Renewal"Get me a new access token."
Final Thoughts
OIDC can initially look complicated because several security concepts are involved at the same time.
But the underlying idea is relatively straightforward.
The application delegates authentication to a trusted Identity Provider. The Identity Provider authenticates the user and returns an authorization result. The application exchanges the authorization code for tokens, validates the ID Token, establishes the application session, and uses appropriate access tokens when communicating with protected APIs.
Once you understand this flow, technologies such as Keycloak, Okta, Microsoft Entra ID, PingFederate, Auth0, Spring Security, and other OIDC-compatible platforms become much easier to understand.
In the next step, the interesting part is seeing this flow in action.
For example:
React → Spring Boot → Keycloak → OIDC → JWT → Role-based Authorization
That takes us from protocol theory to a real implementation.
Quick OIDC Cheat Sheet
OIDC│├── Built on OAuth 2.0│├── Authentication│ └── ID Token│├── Authorization│ └── Access Token│├── Authorization Code Flow│├── Security│ ├── state│ ├── nonce│ └── PKCE│├── Discovery│ └── .well-known/openid-configuration│└── Common Identity Providers ├── Keycloak ├── Okta ├── Microsoft Entra ID ├── PingFederate ├── Auth0 └── Google